Overview
An application user in Power Platform is created via Application Registration in Azure Active Directory (in the azure subscription associated to your Power Platform). Application Users / Application Registrations allow external applications to log into Power Platform applications.
Application Users / Application Registrations are usually used for external applications to perform integrations, for example, service accounts that external applications use to authenticate into Power Platform applications.
Application Users / Application Registrations will appear as users in Power Platform, and I will show you how to find them later in this article.
This tutorial is made with detailed steps to show anyone to create an Application Users / Application Registrations to a Power Platform application (even if it is for a Power Platform trial instance).
References
Part 1 - Open Azure Active Directory that is associated with your Power Platform Instance
Step 1: Log in to office at www.office.com, the user who logs in will need to have Azure Active Directory permissions.
Step 2: Click on the Azure Active Directory admin menu item in the left-hand menu bar.

Part 2 - Create App Registration in Azure Active Directory
Step 3: In the Azure Portal tab that just opened click on the Azure Active Directory button.
Step 4: Click on the App Registration menu item in the submenu.
Step 5: Click the new registration bar in the ribbon.

Step 6: Enter a name, I usually use the format of application then environment EG: ADF Integration - Dev or Site Core Portal - UAT.
Step 7: Set Supported account types to "Accounts in any organization directory".
Step 8: Set the redirect URI if required. I do not require this as I am setting the App Registration up for an Azure Data Factory Blog that I am writing soon.

Step 9: The App Registration is created and the overview page is displayed.
Step 10: Copy and save the Application (client) ID, this will be required later.

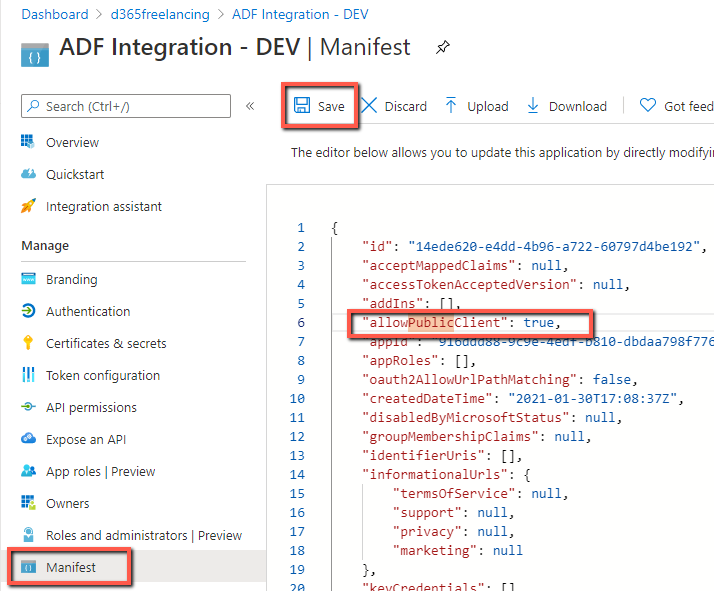
Step 11: Select the Manifest tab.
Step 12: Set value for allowPublicClient property to true.
Step 13: Press Save.
Step 14: Select API Permissions tab on the sub menu.
Step 15: Click Add Permissions button.
Step 16: Select APIs my organization uses tab
Step 17: Type Common Data Service in the search box
Step 18 Select Common Data Service permission.
NOTE the screenshot below is two screenshots joined together to make these instructions more concise.

Part 3 - Create Application User in Power Platform
Step 19: Navigate to the Power Platform Instance.
Step 20: Open the Classic App by clicking on the clog in the top right

Step 21: Navigate to the Application Users by
Step 22: Click on the Settings Area in the Navigation Pane
Step 23: Click on the Security Sub Area
Step 24: Click on the Users menu option
Step 25: Once the Users list is displayed, select the Application Users List.
Step 26: Click the new button
NOTE the screenshot below is multiple screenshots joined together to make these instructions more concise.

Step 27: Select the application User form.
Step 28: Set (paste) the Application Id field to the Application (client) ID copied from step 10
Step 29: Press Save
Step 30: You can validate it worked correctly because the User Name, Application ID URI, Azure AD Object ID, Full Name and Primary Email fields will be automatically populated.

Step 31: The new application users should be displayed in the Application Users list. If you can not see the new application user you may have to refresh the list.
Step 32: Set the required roles on the application user. I will not be writing instructions on this as most of you should already know how to assign roles to a user. Also PLEASE follow cybersecurity best practices and do not give this user system admin, like most people do for integrations, create a security role which has the least permissions required for the external application to perform its functionality.


Comments